Watch the full video instructions here:

View this video on YouTube
BUYING
When To Buy:
If you’re buying a fresh turkey, you want to buy it 2 days in advance. If you’re buying a frozen turkey, you want to buy it at least 5 days in advance (if you’re planning on defrosting it in the fridge, otherwise you can defrost it more quickly in water).
How Big Of A Turkey To Buy:
You want to plan on buying a turkey that weighs enough to leave 1½ pounds per person (a lot of that weight will be bones and the carcass). Bonus tip: If you’re cooking for a large crowd, you’re better off buying two smaller turkeys instead of one huge one. With bigger turkeys, the breasts are so large that by the time they cook through, the rest of the turkey will be very dry, so it’s hard to get an even cook.
DEFROSTING
Storage:
You want to store your turkey on a baking tray to catch any juices that might leak through the bag and onto your fridge. It’s also ideal to store it on the lowest shelf of your fridge in case there are any leaks, so it can’t leak onto other food.
With A Fresh Turkey:
Defrost in your fridge for 1 day. Refrigerators at grocery stores are much colder than what you have at home, so it’ll still be pretty solid if bought fresh. Defrosting it for 1 day at home will ensure that it’s fully defrosted and easy to work with.
With A Frozen Turkey:
You can either defrost it in your fridge for 4-5 days, or if you don’t have that much time, you can defrost it in a container of cold water that you refresh every 30 minutes. This process will take about 30 minutes per pound.
BRINING
When To Start:
Start the brining process 1 day before you’re going to cook your turkey.
Wet Brine Vs. Dry Brine:
Wet brines are the more traditional method where you soak the turkey in a saltwater solution, but we’re going to use a dry brine in our recipe. It’s a little less wasteful and easier to do.
How To Dry Brine:
Measure out ½ teaspoon of salt per pound of the turkey. Cut off any excess skin around the neck of the turkey and take out any innards and the bag of giblets. Some people use these for gravy, but for our recipe you won’t need them, so you can discard them. (If you do decide to use them for the gravy, just be careful not to include the liver, which will leave a metallic taste. And be sure to store them in a plastic bag in your fridge until you’re ready to prep the turkey for cooking.)
Free the turkey’s legs from the plastic holder. Pat the entire turkey dry with paper towels, making sure to get into any crevices until it’s completely dry. This will ensure the salt sticks to the skin. Rub the salt all around the turkey, including any crevices and the cavity.
Storing:
Store uncovered on a baking sheet in your fridge for 1 day. If you’re brining for more than 1 day, cover the turkey with clingfilm until the last day of brining (but make sure you leave it uncovered for one full day so the skin dries out).
What This Process Does:
It’s a flavor enhancer, it allows the meat to hold onto more moisture, and it dries out the skin to make it crispier.
PREPPING TO COOK
When To Start Prepping:
Start prepping a few hours before you want to serve your turkey. This time will largely depend on the size of your turkey. Our 15-pound turkey took two hours to cook and rested for 30 minutes, so 3-4 hours was plenty of time.
Making The Compound Butter:
Combine 1 cup of softened butter with the herbs and aromatics of your choice. We used ⅓ cup of chopped fresh sage, 4 cloves of chopped garlic, 1 tablespoon of thyme, and 1 tablespoon of rosemary.
Prepping:
Place your turkey on a baking rack on top of a baking sheet with your roasting pan next to it. (If you don’t have a roasting pan, you can use a disposable aluminum one with a baking sheet underneath it for support.) Most roasting pans come with a rack, but we won’t be using that. They don’t allow for much air circulation under and around the turkey, so instead we’ll be placing the turkey on a baking rack directly on the oven rack, with the roasting pan on the rack below to catch any drippings.
Cut off the wing tips (cutting through the joint), and place those in the roasting pan for the gravy. We also want to cut out the wishbone before cooking, which will make carving much easier later. Look into the cavity of the bird and you’ll be able to see a white outline of the wishbone. With a paring knife, cut around the bone from the tip to the bottom on either side. You should be able to cut it free, then pull it out using your hands. But if you’re having trouble with it, you can using kitchen shears to cut the bottom of the wishbone’s “legs” to free it. Place the wishbone in the roasting pan for the gravy. You can also add any innards or giblets if you prefer to use them. Take out the plastic holder down by the legs and cavity.
Cover the entire turkey in the compound butter, making sure to cover any crevices and rub butter along the cavity, as well. Instead of filling the cavity with stuffing, which won’t allow for much airflow through the turkey during cooking, we’re just going to stuff our turkey with a couple aromatics. We used ¼ of an onion (with the skin on) and ½ a lemon.
To finish prepping the gravy, you can also add some vegetables for extra flavor. We added the other ¾ of the onion (with the skin on to help the gravy brown), 1 chopped carrot, and 1 chopped celery stalk. We also added 1 carton of low-sodium chicken broth.
COOKING
Preheat the oven to 325°F/160°C.
To carry the turkey over to the oven, place the baking rack on top of the roasting pan to prevent any spills or dripping around your kitchen (place it on an angle if it’s smaller than your pan). Place the turkey on the baking rack directly onto the top oven rack. Place the roasting pan on the rack below that to catch any drippings.
How Long To Cook:
Cook time will largely depend on the size of your turkey. Our 15-pound turkey took about 2 hours to cook. This method has a much quicker cook time than traditional methods because of how much airflow there is around the turkey. It’s a good idea to start checking the temperature of your turkey after 90 minutes.
You want your turkey to reach 165°F/74°C before serving, but make sure to take it out of the oven when it reaches 160°F/71°C. The temperature will continue to rise another 5 degrees while the turkey rests.
Allow the turkey to rest for 30 minutes before carving. In the meantime, finish off the gravy.
FINISHING THE GRAVY
Take out any large pieces with tongs, then strain the rest of the liquid over a large pot. Bring the gravy up to a boil and let it reduce.
This gravy is a little thinner than some people are used to, but it’s flavorful enough as is and will soak right into the turkey. If you prefer a thicker gravy, you can ladle a few spoonfuls into a small bowl with 2 tablespoons of flour and whisk that until it’s smooth. Add a small amount of the flour mixture, then whisk it into the gravy and allow it to come back up to a boil and cook for 5 minutes. The boiling will trigger the flour to thicken the mixture, so give it some time before you decide if you want to add more of the mixture.
You can leave the gravy on a low heat on the stovetop, stirring every few minutes, or store it and heat it back up right before you’re ready to serve.
CARVING
Getting The Meat Off The Carcass:
Transfer the turkey onto a large cutting board with a lip to catch any extra juices.
To stabilize the bird and make it easier to carve, you can release the legs. Find where the legs meet the breast and cut straight down along that line, being careful not to cut all the way through. Then pull the legs to the side and tuck them under the wings to keep them in place.
Cut the breasts off the carcass. Find the breast bone (right down the middle of the bird) and cut straight down to the side of it until you can’t cut any further. This should be much easier since we’ve already removed the wishbone. To help release the breast, you can cut horizontally where the breast meets the wing. Lift the breast off, set aside, and repeat with the other breast.
For the legs, if you weren’t able to release the hip joint when you pulled them to the side earlier, cut all the way through the joint and any remaining skin and meat to cut off the legs. Set aside.
To remove the wings, find where the shoulder meets the breast and cut through that joint. If you’re having trouble with it, you can use your hands to release the joint by popping it out, then use your knife to finish cutting the wing off. Set those aside
Don’t discard the carcass just yet! You can save it and pick any extra meat off of it for leftovers or you can use the entire thing for making a soup later.
Cutting The Breasts:
You want to slice across the grain so the breasts are more tender. Also, by cutting the entire breast off the carcass earlier and using this method instead of cutting it off in slices, everyone can get a piece of that crispy skin.
Cutting The Legs:
First, we want to remove the drumstick from the thigh. Cut through the joint connecting them. You can do an exploratory cut through the meat to find that joint, then adjust your position if necessary. Once you’ve cut through all the meat, you can also use your hands to finish separating them.
For the thigh, find the bone, then cut around either side of it and discard it (or save for later). Then slice the thigh meat into smaller pieces.
Cutting The Wings:
You want to release the flat from the wing, cutting through that joint. Cut through the skin and the meat. Then you can use your hands to release the joint. After releasing the joint, cut through the rest of the meat and skin.
You can also cut off any breast meat that might have been left on the wings and cut that into slices.
PLATING
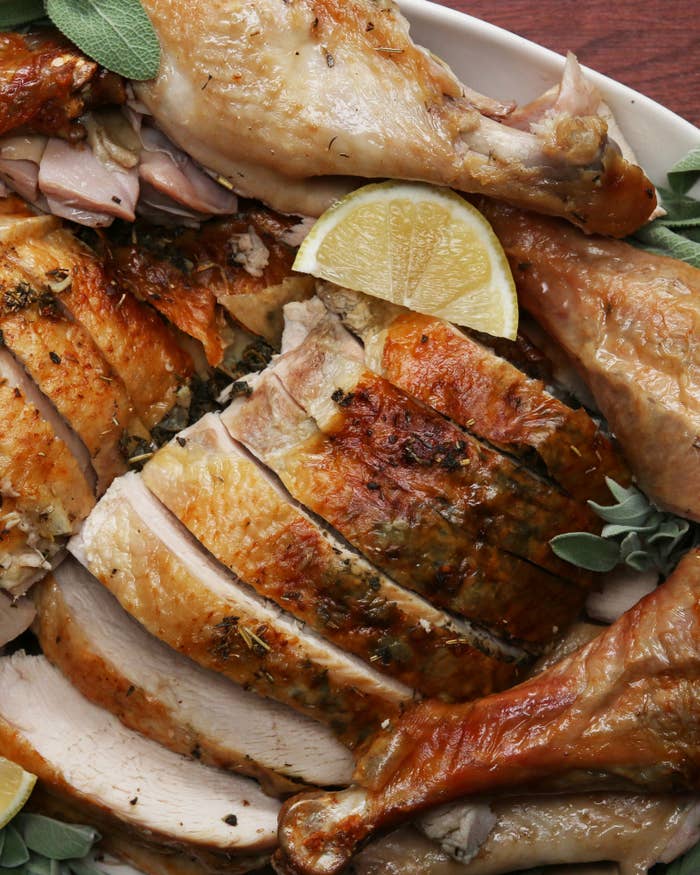
Arranging The Platter:
Rearrange your platter so that the larger pieces with the nice, brown, crispy skin are on top, tucking the smaller pieces underneath.
Garnishing:
You can garnish with any extra herbs (like fresh sage), as well as some sliced lemon if you have it. They add a nice pop of color and freshness to the plate, and can be an easy way to cover up any imperfections while making your platter look fancy for the occasion. Now go and impress your guests and enjoy!